Welcome to Linquip Blog. Today and in this article, we are going to learn how to read and use a micrometer. The information in this article gives a significant collection of data you need to know about micrometers and how they work.
In order to learn how to read and use a micrometer, first, we should learn what a micrometer is.
What is a micrometer?
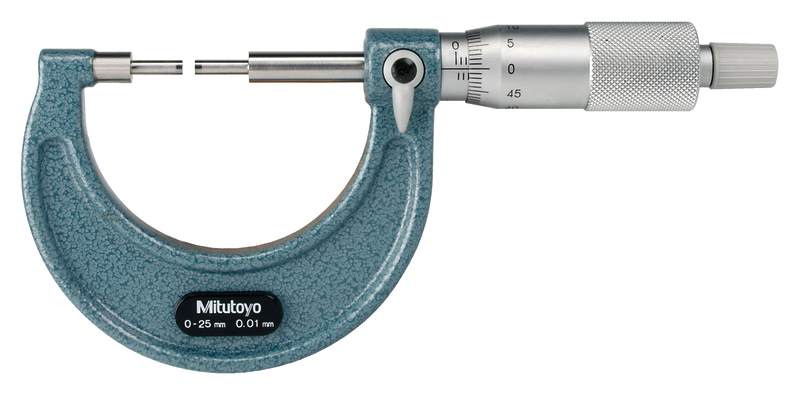
Micrometers (otherwise known as micrometer screw gauges) are essential measurement tools used by mechanical engineers, machinists, and workers in other technical trades. They enable workers to take extremely fine measurements which may be displayed in either imperial or metric formats.
Micrometers allow for a greater degree of measuring accuracy than alternative tools, such as dial calipers and Vernier calipers. They are available in digital, dial, and Vernier styles. The term ‘micrometer’ can be traced back to neoclassical Greece and literally translates as ‘small measure.’
To learn how to read and use a micrometer, we should know that different types of micrometers have measuring ranges of between 25mm and 1 inch. This translates to the incremental metric measurements of 0-25mm, 25-50mm, 50-75mm, and so on. The imperial versions are equal to 0-1 inches, 1-2 inches, 2-3 inches, etc. Boxed micrometer sets can also be used for the purpose of taking micrometer readings across a wide range of sizes.
Types of Micrometer
There are various types of micrometers available, each suited to varying uses and applications. Outside micrometers are one of the most widely used varieties, but inside and depth micrometers are alternatives that may be more appropriate for use in certain scenarios. Below are some of the most common types of micrometers:
- Outside Micrometer: The outside micrometer is the most commonly used type of micrometer. It is used to measure external dimensions such as the outside diameter of an object.
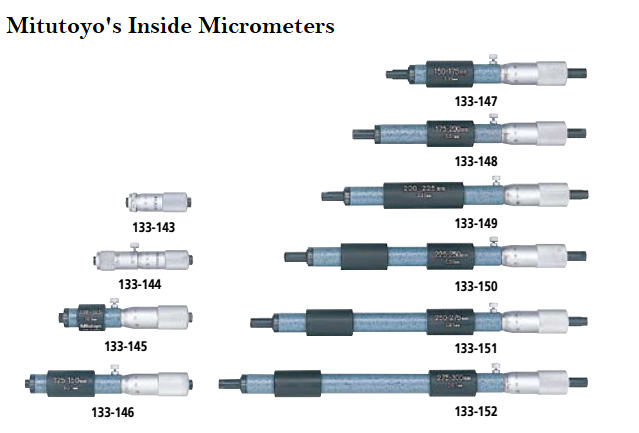
- Inside Micrometer: Inside micrometers are used to measure inside dimensions like the inside diameter of a hole or tube. There are two types of inside micrometers: caliper-type inside micrometers and tubular and rod-inside micrometers.
- Caliper-Type Micrometer: Caliper-type inside micrometers have measuring jaws similar to those found on a dial caliper or Vernier caliper.
The jaws are inserted into the space to be measured and are adjusted by turning the thimble or ratchet speeder. - Tubular Micrometers and Rod Micrometers: Both tubular micrometers and rod micrometers are placed within the space to be measured and extended until the measuring faces contact the edges of the space to be measured.
Rod micrometers come with a selection of measuring rods which, when attached to the tool, extend the measuring capabilities of the micrometer. Some rod micrometers have a handle that connects to the instrument and helps the user to measure inaccessible or difficult-to-reach spaces. - Depth Micrometer: Depth micrometers are used to measure the depths of holes, slots, and steps.
They come with a variety of interchangeable rods of different lengths so that they can be used to measure a range of depths.
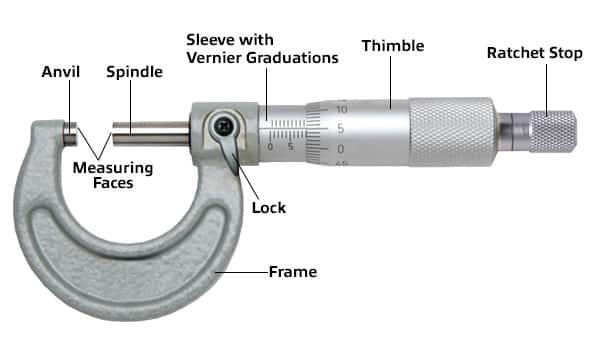
Now that we learned what the different types of micrometers are, In order to learn how to read and use a micrometer, we should learn what are the main parts of a micrometer:
- Measuring FACES
The measured items are put betwixt the measuring faces, the anvil, and the spindle (also called – measuring rods). The ANVIL is the stationary measuring face against which parts are held until the spindle makes contact with the work.
The threaded SPINDLE is the moving measuring face of the gadget. The spindle extends from the thimble. As the operator turns the thimble, the spindle pushes the item to be measured against the anvil. The spindle holds the item snugly against the anvil, and a reading is taken. - Thimble
The thimble refers to the revolving portion of a gadget’s handle. Twisting the thimble opens the tool’s jaws for reading inside ranges, or extends a rod for calculations of outside ranges of depth. Markings on the thimble revolve along with the handle to align with the barrel’s scale and provide a measuring. - Locking nut
The locking device secures the spindle and preserves the measuring so that the micrometer can be removed from the workpiece before taking the reading. Some of the gadgets have a lock nut (as shown), whilst others may have a locking lever. - Sleeve (Barrel) scale
The barrel forms the uppermost part of the handle; the part closest to the frame’s “U.” The barrel is a cylindrical piece of metal, integral to the frame; the frame and barrel are molded as one piece. The barrel’s circumference features marks that indicate a measuring. Because the micrometer-caliper measures on a micro-scale, its calculations are often lengthy decimals. To save space on the barrel, the marks appear as whole numbers that refer to a legend printed on the frame’s exterior. In the case of the sub-division group – the Electronic Micrometers, the results are shown with mechanical numbers that roll over. - Ratchet speeder-stop
The ratchet speeder increases the speed at which the spindle rotates, so the space betwixt the anvil and the spindle is reduced more quickly than it would be if the thimble were in use. Using the ratchet speeder reduces the time it takes to use the gadget.
The ratchet incorporates a slipping clutch mechanism that prevents overtightening and aids the user to apply a constant measuring force to the spindle, helping to ensure reliable measurements. If the force were to be excessive then it would be possible to overstress the frame thus causing permanent damage to the micrometer which would, in turn, lead to incorrect readings being obtained. To overcome this problem the ratchet stop is fitted and this drives the thimble through a ratchet device. - FRAME
The frame is the basic element of any micrometer-caliper. The frame appears as a roughly U-shaped piece of metal. Etched upon the frame’s exterior is a legend, or list, explaining the graduations indicated on the tool’s barrel. A handle protrudes from one side of the frame so that its appearance resembles a small scythe.
How to Read a Micrometer
Micrometers are the ideal tool for the measurement of cylindrical and spherical-shaped objects. In order to use a micrometer, you should follow these steps:
- Take time to acquaint yourself with the main technical terms
- Clean the micrometer, using a soft cloth to remove any marks and debris from between the anvil and spindle
- Begin by positioning the item being measured next to the anvil. It is important to keep the object stable and avoid any scratching. You may control the micrometer with your free hand, or alternatively, there is the option of using a stationary vise, leaving both of your hands free for control of the micrometer
- Spin the ratchet anti-clockwise, ensuring that the 0 marks on the thimble are positioned following the sleeve scale. Keep twisting until the spindle is within close contact with the object; three clicks is a good guide
- The thimble lock should be applied while the micrometer is within proximity of the object. It should be possible to adjust the spindle as required. Once you are confident that the micrometer has fulfilled its function you can remove the object, taking care to avoid scratching the anvil and spindle surfaces
- Finally, record the reading, ensuring that the spindle is kept stable.
Measuring Procedure
- Situate the item whose length, diameter, or thickness is to be determined betwixt the rods (spindle and anvil).
- Turn the thimble or ratchet to close the rods around the item to be measured. The rods should lightly touch the item betwixt them but not clamp down on it.
- Flip the locking lever to lock the rods in place.
- Read the value just exposed by the thimble on the central line of the cylinder. This value is in mm (millimeters). Typically, there is a mark every half-millimeter, with the mm marks rising above the central line and the half-millimeter marks going below it. For example, you might note that an object indicates 12.5 millimeters.
- Read the mark on the thimble aligned with the central line on the cylinder. This mark is in hundredths of mm. For example, you might read figure 12 on this scale, indicating a reading of 0.12 mm. There are 50 such marks, meaning that each turn of the thimble corresponds to half a mm, the distance betwixt the upward and downward marks on the cylinder centerline.
- Add these values together. This is the measurement of the item betwixt the rods. In the example, you would add 12.5 and 0.12 to get 12.62 millimeters.
What is A Micrometer Used for?
Because of its capability in providing accurate measurement, many work fields rely on the micrometer. It is widely used in metalworking, machinery, mechanical engineering, laboratory, home use, engine building, hobby (cartridge reloading), etc. all the things that need high accuracy.
It measures thickness, inside diameter, outside diameter, length, and depth. There is a wide area of dimension a micrometer can measure, some of them will be described in the following list.
You need to know that a micrometer only has a specific function. When it comes to measuring a ball-shaped object, the flat anvil type micrometer is less preferable to use compared to the V anvil micrometers. In this case, having a good insight into some micrometer types help you decide to buy the right micrometer. Further, when you want to decide what micrometer is best for you, an appropriate type of Anvil is a must to guarantee measurement accuracy.
Proper Use and Care for a Micrometer
- Be sure to unlock the locking lever before attempting to revolve the thimble.
- Clean the measuring faces with a clean cloth before and after measuring. It is also a good practice to occasionally clean the spindle to keep any contaminants from being drawn into the sleeve.
- Use the grip on the thimble when requiring a large amount of travel but as you come close to closing in on the item to be measured use the ratchet stop to not overtighten the thimble and give an erroneous reading.
- When a gadget is at its minimum reading the horizontal line on the sleeve should line up with the ‘0’ on the thimble. If that is not the case it will be necessary to calibrate the micrometer by revolving the sleeve. Each gadget comes with a half-moon adjusting wrench for this purpose. To adjust simply puzzle the wrench to the side of the spindle and insert the small tip into the leverage hole. It will not require much effort to turn the spindle however there is sufficient resistance in the spindle so that it will never move on its own. Larger gadgets are supplied with standards to check for correct calibration. When checking, be sure to hold the standard squarely betwixt the anvil and spindle. To help with this try revolving the standard slightly with your fingers while gently turning the thimble as you close in on the standard.
- Never leave a tool exposed in the hot sun (store it in a toolbox, on a quality shelf, or in a cabinet, that can be found and purchased in furniture stores) and then attempt a measuring procedure. This would also lead to an erroneous reading.
Now you know how to read and use a micrometer like a pro!
Hope you enjoyed the article! You can find similar content on Linquip, a professional network for equipment manufacturers, industrial customers, and service providers.
Buy Equipment or Ask for a Service
By using Linquip RFQ Service, you can expect to receive quotations from various suppliers across multiple industries and regions.
Click Here to Request a Quotation From Suppliers and Service Providers
Read More On Linquip
- 3 Different Types of Hygrometers and Their Applications
- A Quick Look at Types of Spectrophotometers
- An Easy Guideline to How to Use a Refractometer
- What is the Similarity Law of Fluid Mechanics?
- Your Convenient Preventive Maintenance Checklist
- How to Use and Read a Hydrometer: Your Concise But Complete Guide


Thank you so much I have learnt how to use a metric micrometer
Thanks for visiting our website, Mutema! We also encourage you to visit the Linquip website, where you can find numerous industrial equipment, along with companies and experts.