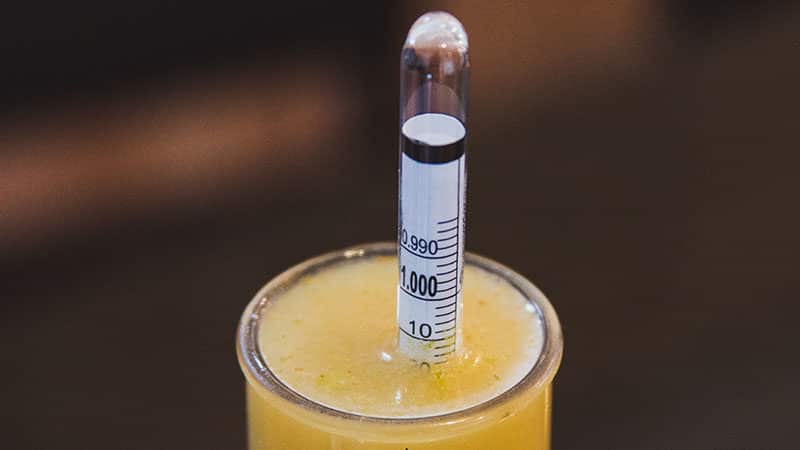
You might already know that a hydrometer is a device that is used to measure the specific gravity, or in other words, the relative density of liquids. And that is a good start, but do you know how to use and read a hydrometer?
In this article, you will first get a brief introduction to what hydrometers are to get a better sense of how to use and read a hydrometer.
How to Use and Read a Hydrometer: The shortest story
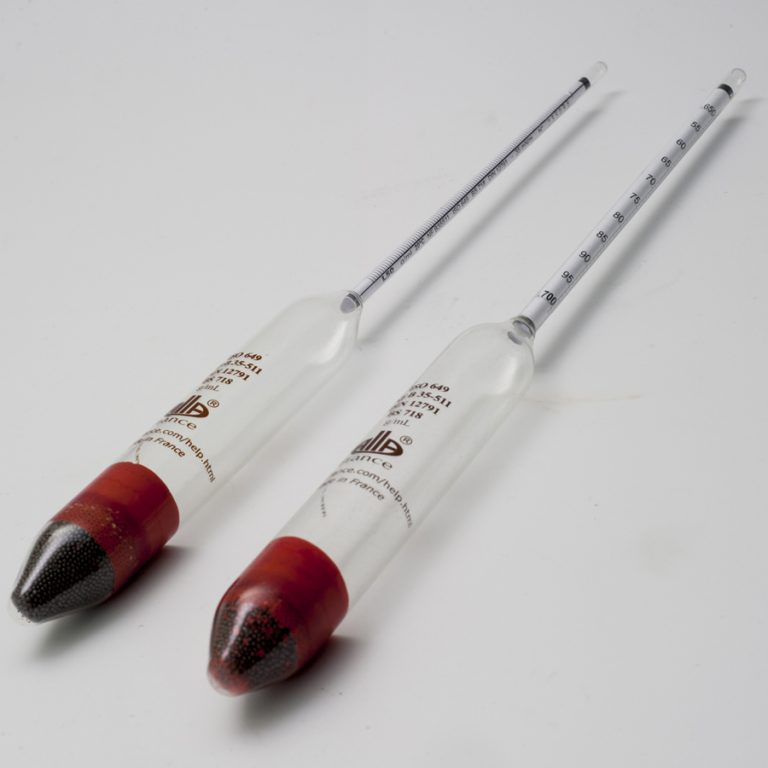
A hydrometer is a device usually made of glass, which consists of a cylindrical stem and a bulb weighted with mercury or lead shot to make it float upright. As already mentioned, it is used to measure the specific gravity of liquids, i.e. the ratio of the density of the liquid to the density of water.
A hydrometer operates according to the Archimedes principle stating that a solid-state body displaces its own weight with a liquid in which it floats. The liquid to be tested is poured into a tall specially designed cylindrical container, and the hydrometer is gently lowered into the liquid until it freely floats. There is a point at which the surface of the liquid touches the stem of the hydrometer. This point is noted as the reading point.
These devices usually have a scale inside the stem by which the specific gravity is read. There could be a different scale inside the stem depending on the context of usage. These scales include Specific Gravity (SG), Brix, Baume, and Alcohol. In the specific gravity or standard hydrometer scale, distilled water has a specific gravity of 1.000. Therefore, liquids heavier than water are scaled above 1.000 SG and those lighter than water are scaled below 1.000 SG.
How to Use and Read a Hydrometer: Function, Scale Types, and Use
A hydrometer is a device made up of a thin tube made from glass or plastic that is sealed at both ends. The scale to which the hydrometer is calibrated is either graduated or printed on the tube. One end of the tube is bulb-shaped and weighted with a ballast of either fine lead shot or steel shot. The ballast is what makes the instrument float upright in a liquid like a fishing bobber. A second glass or plastic cylinder, commonly known as a hydrometer jar, is filled with the liquid being measured. The hydrometer is then placed in the hydrometer jar containing the sample liquid.
The specific gravity of the sample liquid is indicated when the level of the sample liquid in the jar aligns with a point on the hydrometer scale. Depending on which scale is used, the number of times heavier or lighter than water the sample liquid weighs can now be recorded. In addition to reading specific gravity values, scales on a hydrometer can be calibrated to Baume, Brix, Alcohol, API (American Petroleum Institute Index) and others for specific chemicals.
Brix Scale: A hydrometer calibrated to read in degrees of Brix or Balling, or percent of pure sucrose (sugar) by weight.
Baume Scale: A hydrometer calibrated to read degrees of Baume, which is a pair of scales: one for liquids heavier than water and one for liquids lighter than water.
Alcohol Scale: A standard specific gravity hydrometer used to measure specific gravity before and after a liquid ferments. The difference between the two specific gravity readings is referenced to an alcohol scale to determine percent alcohol by weight
API Scale: The API scale is a measure of how light or heavy a petroleum-based liquid is compared to water. It was designed to allow a comparison between the densities of petroleum liquids.
How to Use and Read a Hydrometer: Method of Reading
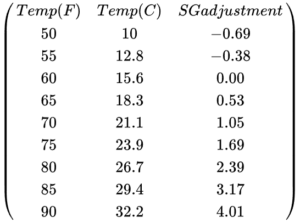
It is possible for some hydrometers to have multiple scales printed on them. It would be best if you filled the hydrometer jar with the sample liquid to use it. Place the device in the jar and twirl it to dislodge any trapped air. You can read from your desired scale once the hydrometer has settled. Note that you need to keep the sample liquid temperature at 60°F to get an accurate measurement. Evidently, you need to adjust the measurement for liquid temperatures other than 60°F.
For a standard hydrometer that is calibrated for 60ºF, you can use the following table for temperature adjustment. You need to find the temperature of the liquid in either column 1 or column 2 and add the corresponding value in column 3 to your specific gravity reading.
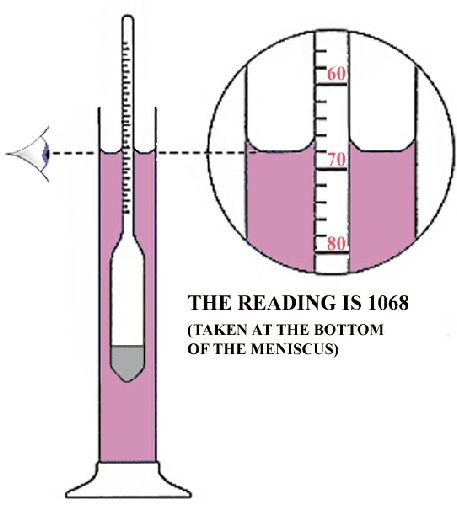
Also note that for reading transparent liquids, the eyes should be placed slightly below the plane of the liquid surface and then raised slowly until this elliptic surface is seen as a straight line. The point at which the line sits on the hydrometer scale is recorded as the reading of the hydrometer.
There are times when the liquid is not sufficiently clear to read the hydrometer the way described above. In this case, you need to read from above the surface and try to estimate as accurately as possible the point at which the liquid rises on the hydrometer.
How to Use and Read a Hydrometer: Accuracy
Three factors are mainly responsible for the accuracy of measurement:
- Cleanliness: It is very important for the liquid to uniformly rise to merge into an almost invisible film on the stem. Therefore, the hydrometer surface, stem, hydrometer jar, and the liquid in which the readings are taken should be properly cleaned.
- Temperature: In order to avoid changes in density during testing, the hydrometer and liquid should be at the same temperature as the ambient temperature.
- Proper immersion: a hydrometer jar should have an inside diameter of approximately 1 inch (25mm) greater than the outside diameter of the hydrometer.
How to Use and Read a Hydrometer: The Steps
The first thing to do is to check the hydrometer’s temperature calibration. Since liquids expand and contract in response to temperature alterations, you need to test liquids at the temperature for which your hydrometer is designed so that you would get an accurate reading. This design temperature of the hydrometer should be listed on its instruction manual or label.
The second step to take is to measure the temperature of the liquid. Note whether it is more than some degree or too off from the hydrometer’s intended temperature. You might be able to correct your reading using the table provided for temperature adjustment a little earlier in the article.
Third, you shall pour a sample of the liquid into a clean container such as a transparent jar. Note that it should be large enough for the hydrometer to float in without hitting the sides or reaching its bottom.
You are now ready to lower down the hydrometer into the liquid just below the point at which it would naturally float. Make sure it is dry before inserting the hydrometer and also the hydrometer bulb does not touch the sides of bottom of the container as it settles in the liquid.
Now, you need to spin the hydrometer gently to release the air bubbles clinging onto the device. You cannot take your reading now and must wait until all bubbles are gone and the hydrometer and the liquid have stopped moving.
You can now read the hydrometer scale at the lowest point of the liquid’s surface. This is because some of the liquid will cling onto the surface of the hydrometer stem due to capillary action in a way the makes a curved surface of the liquid. The vertex of this curve is where the reading shall be taken.
It is important to understand the scale of measurement after you take the reading. As stated earlier, there are several scales available for hydrometers, most common which is “specific gravity”.
How to Use and Read a Hydrometer: Commonly Asked Questions
- How do I select the correct hydrometer for my needs?
Anyone using a hydrometer needs to have a general idea of the scale they need and the anticipated value on that scale for the process they are doing. Researching the industry norms for the process either online or via industry contacts can help you make the correct selection.
- How do I convert degrees Baume (salt scale) to a specific gravity reading?
At 60°F, specific gravity can be calculated by using the following formulas:
Liquids lighter than water:
specific gravity = 140 / (degrees Baume + 130)
Liquids heavier than water:
specific gravity = 145 / (145 degrees Baume)
Buy Equipment or Ask for a Service
By using Linquip RFQ Service, you can expect to receive quotations from various suppliers across multiple industries and regions.
Click Here to Request a Quotation From Suppliers and Service Providers
Read More On Linquip


