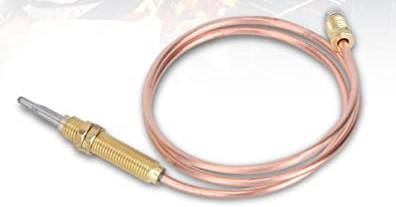
Many people explain what a thermocouple is exactly; however, they may not know one of the useful applications of this instrument: thermocouple for water heater. A thermocouple is a beneficial transducer that is combined with the gas furnace in some applications. It is employed to identify whether the pilot light is operated or not. It is also attached to the furnace’s gas valve directly. When the system lit turns off according to the loss of heat, this instrument senses it and cuts off the fuel injection. You may suggest that the water heater requires repair or replacement when the thermocouple fails. But the improvements cause the repair of this component to be too inexpensive and simple.
Thermocouple for Water Heater Replacement
A thermocouple is a device utilized to monitor the liquid flow in water heaters. On older-model heaters with particular pilot lights, the instrument is normally introduced as the thermocouple, whereas on newer styles with an electronic system, the virtually same instrument is called a flame sensor. For our definition in this post, we’ll introduce both instruments as the thermocouple for a water heater.
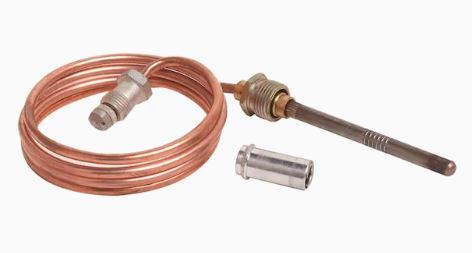
The thermocouple is an essential part of the pilot burner system and attaches to the control section on the other side of the water heater. It is a common instrument that modifies the heat from a burning flame form to the electrical output, permitting it to run like a switch to detect the flow from the gas source valve. In other words, when the thermocouple doesn’t identify the flame, it avoids the gas source from sending gas to the section of burning. So, it is an important safety part of our water heater systems. Otherwise, an improper thermocouple for a water heater is the main reason why its pilot does not operate, or the burner does not run appropriately.
The kind of ignition style you have in your thermocouple for a water heater will specify how you fix it. With both a standing pilot or electronic type, the thermocouple is a part of the burner setup. However, with a standing style, there is only a pilot and thermocouple combined with the burner, while with an electronic model, there is both the thermocouple and pilot and the electronic igniter combined with them.
Instructions of Replacement of the Thermocouple for Water Heater
How to Disconnect the Gas Control Valve
The first step for servicing a thermocouple for a water heater is the disconnecting gas control valve. You should turn off the gas control valve on the system and close the shutoff section on the gas source piping of the water heater.
You must then eliminate the cover panel of the burner section in standing models or burner fold cover surfaces in electronic styles. An open-end or adaptable wrench can be utilized to reduce the basic burner source tube, the thermocouple connections, and the pilot source tube from the monitoring valve.
How to Replace the Thermocouple for Water Heater on an Electronic Ignition
Remove Burner Assembly Cover
The combustion tank of water heaters with electronic ignition is covered with tight sealings. You should eliminate the burner assembly cover to fix the combustion source. It has to protect the chamber and its source tube, burner section, electronic part, pilot, and thermocouple.
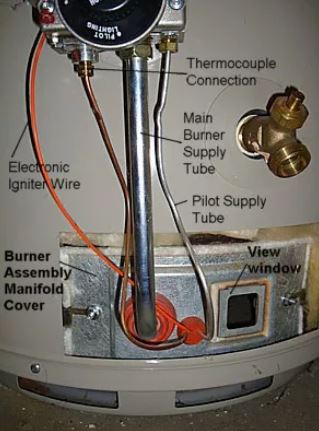
You should primarily remove the securing cover of the burner assembly surface. This panel may be connected by screws, nuts, or particular resistances based on the model and brand of a water heater.
Remove the Burner Assembly
First, you should disconnect the burner source and push the manifold down slowly to fix the pilot setup and the thermocouple connections.
If you remove the manifold assembly from the burner source accurately, the internal components will not be damaged. If the burner does not remove simply, check around the main surface because there may be extra connections.
Remove the Cover Plate Gasket
You should carefully eliminate the old gasket from the cover plate and clean the metal gaps between the cover surface and the water heater.
Remove the Thermocouple
Finally, you must disconnect the broken thermocouple from its mounting cover slowly. If you apply a little pressure, it will disconnect simply. You should not deform the connection between the thermocouple cover and the pilot. However, in special situations, you should remove the thermocouple by cutting it.
Install a New Thermocouple for Water Heater
You can use the old thermocouple for the home improvement, hardware, or plumbing resource to buy an accurate replacement. If you want to replace the old one, you can buy a new sealed one for the manifold plate.
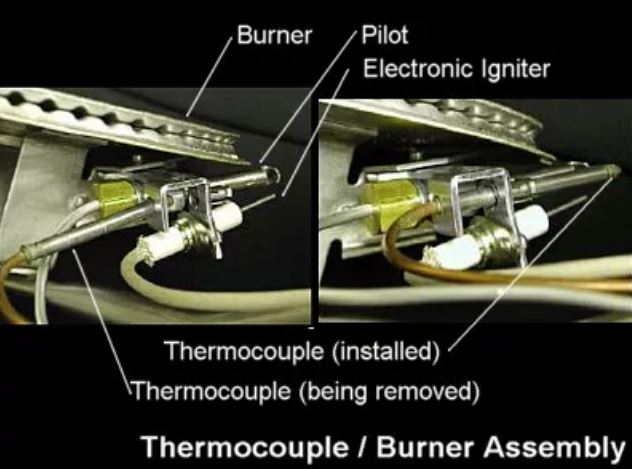
You should insert the modern thermocouple for a water heater from the opening side of the burner assembly surface. The thermocouple should be inserted into its mounting section to be fully placed in its location.
Reinstall the Burner Unit
You should set up the burner in the source of combustion properly to install the unit. It can resolve the installation problems of a new burner cover section.
Read More on Linquip
- What is a Thermocouple & How Does It Work?
- Parts of Boiler and Their Function in the Boilers
- Water Tube Boiler: What You Need to Know
- working principle of thermocouple: the operation is governed by 3 effects
How to Replace the Thermocouple on a Standing-Pilot Water Heater
Remove Burner Assembly
The burner assembly can be disconnected from the water heater when the burner tube, pilot source tube, and thermocouple are removed from the gas control section.
Remove the Thermocouple
You should firmly pull the last thermocouple from the old bracket. You can utilize firm pressure to prevent the deformation of any part.
Install a New Thermocouple for Water Heater on a Standing Style
You may employ the old device in the home improvement, hardware, or plumbing resource to replace an exact thermocouple for a water heater. The new thermocouple should then be inserted into the bracket place to be fully sealed and placed properly.
Reinstall the Burner Unit
Finally, the burner in the chamber can be reinserted appropriately to be placed in the unit and reconnect the gas valve of the monitoring system.
How to Reconnect the Gas Control Valve
When the new thermocouple is set up for both electronic model and standing pilot styles of water heaters, the burner, pilot, and thermocouple should be reconnected to the gas control valve.
Reattach the Gas Tubes
The pilot source tube, burner tube, and thermocouple must be reconnected properly to the gas control section.
Turn on the Gas
The shutoff valve part on the gas source piping should be opened and switched to the ON state. Now, you can set the system’s thermostat to a suitable temperature.
Test the Water Heater
You can check the function of the supply tube and pilot source at the control section for gas leakages by employing a soap-and-water method. In this way, you should cover the gaps with the soapy liquid and look for new bubbles that determine a leakage. If leakage is seen, you must seal all connections and recheck them by the same method.
How to Diagnose and Fix the Thermocouple for Water Heater
Diagnosing the Problem
You must explore more about where the problem happens with the thermocouple for a water heater before you can practically diagnose and detect it. You can find the thermocouple in the burner section exactly in front of the light with a particular metal in cylindrical format.
The thermocouple for the water heater operates as a safety instrument to identify the burning condition for gas-powered systems. This means that if the thermocouple works improperly, there is no solution for identifying if the pilot is burning or not, and you will not have hot water resources in your pumping circuit. You can try to relight the system if you want to test the thermocouple’s problem.
It is not vital to eliminate the burner system for replacing the thermocouple. The component can be repaired simply, but it becomes easier if the burner system has been removed.
Disconnecting the Thermocouple & Replacing the Other one
Replacing the thermocouple is too easy to apply and needs just a few steps to do and to remove the burner. A particular screwdriver will permit you to eliminate the cover. You should turn off the gas source to disconnect the thermocouple from the main section. This permits you to fix the gas tubes, the thermocouple, and the gas valve simultaneously.
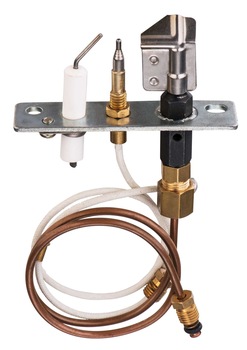
The new thermocouple for the water heater must be installed with the same method as the old one’s mounting and position. The setup details may differ based on the design of a water heater.
Thermocouple for Water Heater Cost
Another important aspect of this post is the cost of repairing the thermocouple for the Water Heater. Homeowners often ignore the condition of the water heater. This unit is out of mind and out of sight because it has been worked too long. But it becomes difficult to ignore when a broken water heater influences the quality of our lives in various ways.
For instance, hot showers will not operate appropriately, or laundry equipment will not perform powerfully in work. The good tip is that water heater problems can normally be fixed immediately. Has your system leaked? Is it easily not operating as intended? You can easily repair or replace it. However, as you notice this possibility, it’s common to think about the cost. For example, how much will the thermocouple for water heater replacement cost? We’ll answer this question in this complete guide.
One of the most important matters will be the particular part that needs explanation is the cost of your electric system repair. The price of each section can differ based on various aspects like construction and model. We will present a general evaluation of how much replacement instruments can cost in this section. For a total estimation, the average price of repairing a water heater is typically $506.
Water Heater Replacement vs. Repair (Heading 3)
Many features can specify the cost. One of the most vital matters is whether you want to replace your hot water heater or repair it.
An appropriate rule of usage is that the water heater’s life cycle is generally about 9 years. This time is a good estimation to keep in mind in a normal situation. However, water heaters used heavily may not pass this time. If your system is more than 9 years old and begins to have some problems, it is certainly more cost-effective to replace it. Repairing this system is like a short-term fix.
On the other hand, if your package is under six years old, you may want to repair it generally, and the replacement method is not necessary in this case. Whereas it may be sensible to replace it, it cannot pass the financial costs to do. You should always talk with a skilled plumber to advise you on choosing the best method. That will be one of the important features to reduce the cost of your water heater problem.
The Cost of Replacing the Thermocouple for Water Heater
Thermocouples provide a simple task. They sense whether the light of pilots is lit or not in water heaters. This uses to control the gas valve. Eventually, this method just impacts gas. If the thermocouple doesn’t operate well, it cannot identify the problems. So, if your system has a faulty thermocouple, it is fundamentally impossible to run the water heater.
Nevertheless, it’s simple to replace and add a modern thermocouple for a water heater at a low cost. It’s easier to eliminate the total burner and thermocouple setup instead of trying to remove the thermocouple individually. Visit here to explore more about the replacement cost of a thermocouple for a water heater.
When your thermocouple doesn’t operate properly, you should replace it by employing a professional plumber to apply it with a total cost of about $200.
How to Check if You Have a Dirty Thermocouple for Water Heater?
A dirty thermocouple cannot sense the heat situation or its loss. It cannot also give correct outputs. It will sometimes cut the gas link to the furnace when the pilot light is operating. In this condition, the soot has covered the thermocouple.
How to Clean Thermocouple for Water Heater?
At first, you must disconnect the power supply from the system so that you are not damaged while cleaning the thermocouple. The first issue which must be considered is that the ends of the thermocouple may be oxidized. This can stop the power procedure from receiving the pilot lights. Using an emery cloth sandpaper can solve this problem. You must continue doing this until the end of the piece is completely cleaned.
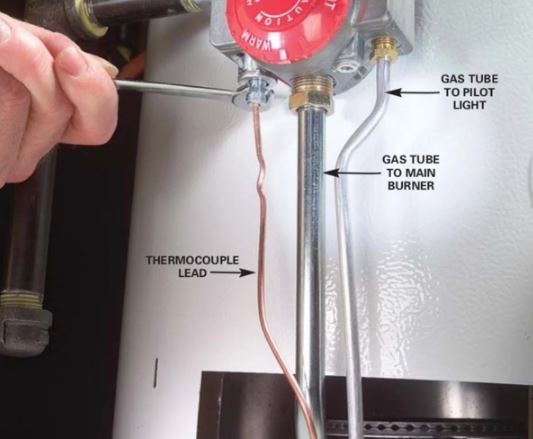
This method will eliminate some particles that were left on the surface of the thermocouple for a water heater. You can employ a flashlight when you want to turn on the water heater again to check it properly. If the water begins the heating up process, the cleaning procedure has been done appropriately. If not, the replacement of the old thermocouple is the last way.
Buy Equipment or Ask for a Service
By using Linquip RFQ Service, you can expect to receive quotations from various suppliers across multiple industries and regions.
Click Here to Request a Quotation From Suppliers and Service Providers
- The Best USA Thermocouple Manufacturers in 2022
- Working Principle of Thermocouple: 2022 Guide + Diagram
- What is a Thermocouple & How Does It Work?
- Thermocouple Types: A Complete Comparison Between Them
- Thermistor vs Thermocouple: Complete Comparison & Practical Selection Guide
- Thermocouple vs. Thermopile: A Complete Comparison & Advantages of Each Type
- Difference Between Thermopile and Thermocouple

